Garrett Griffin-Morales
Scheduled Jobs provide a way to automatically run activities at certain times on the ServiceNow® platform - to schedule updates, notifications, reports, and more.
Note that ServiceNow Flow Designer flows provide almost all of the functionality found in scheduled jobs, including the ability to use complex scripting, and they are easy for a low-code person to use. So, it would seem that flows are a good way to go for the future.
But scheduled jobs are still here - my PDI has hundreds of scheduled jobs. Scheduled jobs can also be very simple to set up and your organization may already be using a few custom jobs that you need to support.
Where are they?
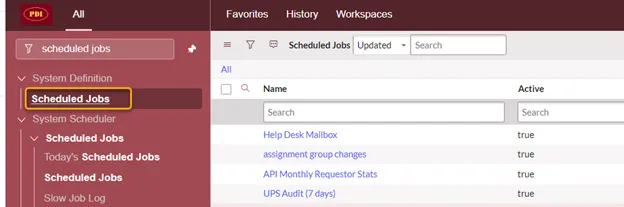
Go to System Definition > Scheduled Jobs to see the jobs on your instance. This is where they are set up and this is where you can add new job entries.
This is different from System Scheduler > Scheduled Jobs > Scheduled Jobs (or Today’s Scheduled Jobs), which shows jobs lined up with the expected “Next action” time and their state, like “Ready”. If you look at this list, be aware that it is normal for the Ready state to turn red in color for a while when the Next action time on a job is exceeded. That may mean that the job is waiting for another job to complete, or that it is still in process.

Create a Scheduled Job entry
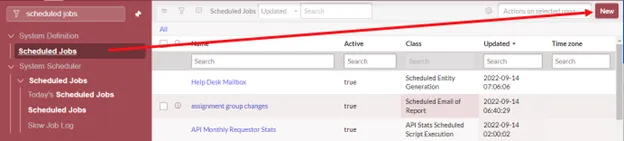
Back on System Definition > Scheduled Jobs, click “New”.
The Automation Creator screen displays. We’ll look at the first three options offered.
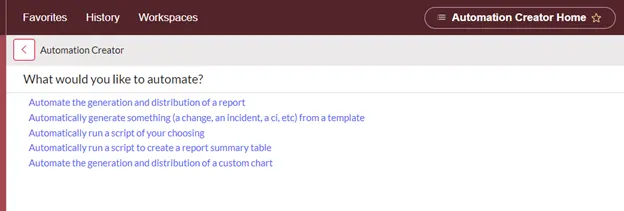
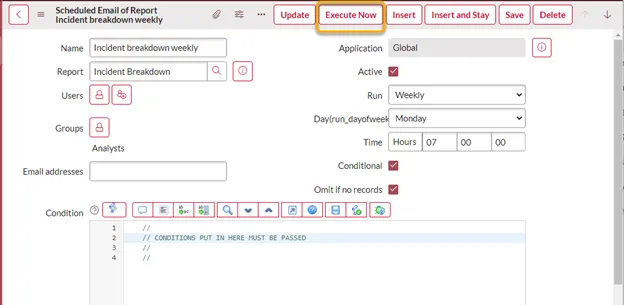
- Automate the generation and distribution of a report
This option allows you to select a report to be emailed to users on a schedule, such as a weekly report on incidents for your service desk manager. The screen may look familiar since it’s the same form used when creating a scheduled report from Reports > Scheduled Reports.
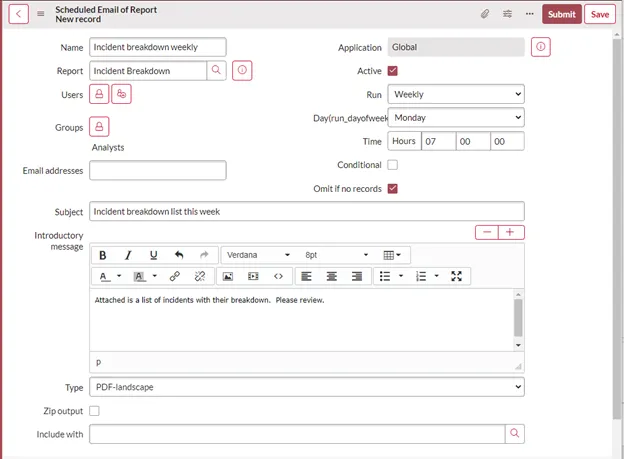
Most of this is straightforward to fill in - provide a Name, pick a Report (or make a new one to use for this), fill in users, groups, or addresses to notify and the scheduling fields, and the subject and message for the email that will have the report attached.
Conditional: when checked displays a script field to allow for a scripted condition.
Omit if no records: when checked means the report will not be emailed if there are no entries found when it is run.
Type: defaults to PDF-landscape, but other file options can be selected for the report.
Include with: allows you to select another Scheduled Report so it will include this report in its mailing.
- Automatically generate something (a change, an incident, a ci, etc) from a template
This option creates records on Incident, Change, etc., according to what the selected template specifies.
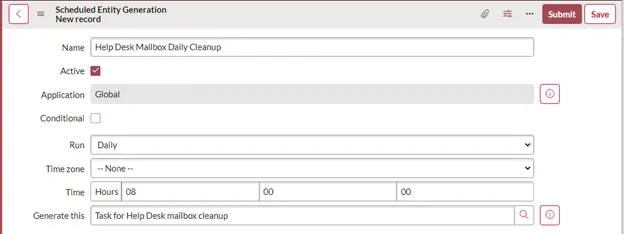
Conditional: when checked displays a script field to allow for a scripted condition.
Generate this: This field allows you to select a template to generate whatever type of record the template is made for. These templates are also listed in the module System Definition > Templates.
- Automatically run a script of your choosing
This option is straightforward if you know how to write scripts. With scripts, you can do things like creating or updating records or sending notifications.
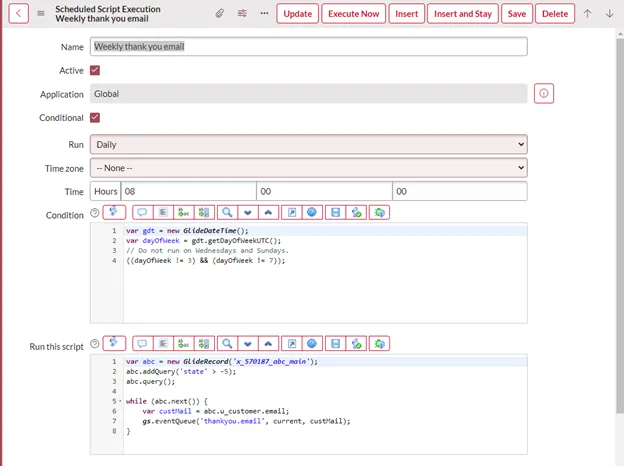
Conditional: when checked displays the “Condition” script field.
Condition: This optional field holds a scripted condition.
Run this script: This field holds the script performing the action you want to achieve, such as creating or updating records. This example script calls an event that sends a notification.
The screenshot above shows the entry after it is created, which makes the “Execute Now” button shown. Note that testing the job using “Execute Now” in this example will not work on a Wednesday or Sunday, since the Condition field script that says not to run on Wednesday or Sunday applies even for “Execute Now”. See the next article section for more details.
The “Execute Now” button (all job types)
After any job entry is saved, the “Execute Now” button appears.
BE CAREFUL WITH THIS ON PRODUCTION. “Execute Now” puts the job in the queue right away regardless of scheduling fields like Run and Time. (However, if you have a script in the Condition script field, its conditions have to be met for Execute Now to work.)
This can be useful for testing your job on a Dev instance or for making a one-time manual run of the job.
Conclusion & Import Tips
As you can see, it can be easy to set up a scheduled job.
There are two other scheduled job types listed in Automation Creator that this article did not cover:
- Automatically run a script to create a report summary table (See the navigator module Reports > Summary Sets)
- Automate the generation and distribution of a custom chart (See the navigator module Reports > Custom Charts)
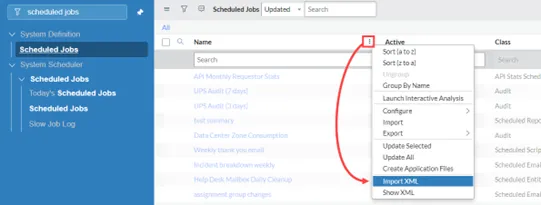
Also, scheduled jobs are not included in update sets automatically, so take that into account when moving changes between instances. One way to handle that is to open the job record and export it using the Context hamburger menu > Export > XML (This Record).
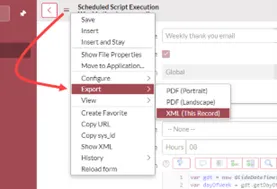
Then on the target instance, in a list view, right-click a column heading (or hover and select the three dots for a column heading) and import using the “Import XML” option.
If the job has a template, report, or another record that it needs to use, be sure that is also on the target instance.
We hope this article has been of use to you!