Garrett Griffin-Morales
The ServiceNow® platform has many settings that control how it behaves, a good number being through System Properties. As an administrator, you may need to reference a property or activate/deactivate a feature via a property setting.
Where do I find them?
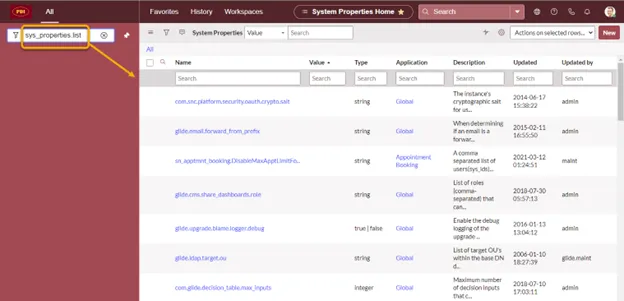
You might want to memorize the table name sys_properties, make a favorite, or make a module for it as shown at the end of this article. In the filter navigator enter sys_properties.list (or sys_properties.LIST to open a new tab) to see a list of properties on your instance.
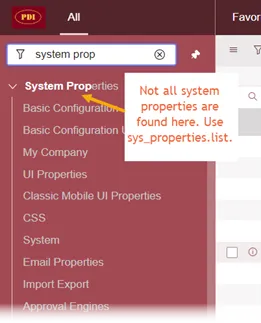
There is a menu named System Properties in the navigator, but it does not contain all properties. The properties it does have are divided up into modules like UI Properties, System (which has a very small subset), Dashboard Properties, and Global Text Search. This is handy as a quick go-to if what you need is there. It’s also useful because some modules like Basic Configuration UI16 and Email Properties have settings that are not found in sys_properties.
Taking a look
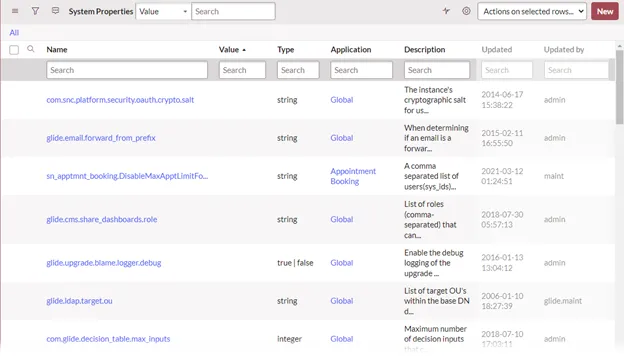
Viewing the sys_properties list, you’ll see that many are of type “true | false” with a true/false value or “string” with values like a sys_id, URL, lists of field names, etc. Additional types include “integer”, “choice”, and others.
Note the way properties are named. System properties do not have a strict naming convention technically, but if you create a custom one, you might want to follow the convention of using lowercase letters with dots or underscores between words for its name.
What do system properties provide?
System properties can be read across workflows and scripts. They can allow you to change a default or behavior without getting into code or workflow, by simply updating the value of a property.
Most are supplied to affect functionality or features provided by ServiceNow, Inc., such as menu selections for how many rows to show on a list or whether Dark themes are enabled on your instance.
You can also add custom properties to support custom workflow or scripts, which is discussed later in this article.
How do I work with system properties?
You can update a system property to change a value that’s referenced by workflow/scripts or to enable/disable functionality.
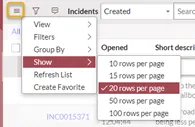
For example, the system property “glide.ui.per_page” controls what menu options are available in lists for the context menu’s Show > x rows per page.

A property can contain text for an error message, making it easy to change the wording.

One of the system properties that enable functionality is “glide.ui.polaris.experience”. To enable the Next Experience (the new UI) in San Diego and later, this property must have a value of “true”.

Another example is the use of a property to store the sys_id of a record you want to reference. A property that does this is “glide.notification.email.default_template_sys”, which contains the sys_id of the email template to be used by default for new notifications.

Some system properties defined by ServiceNow are not in sys_properties by default but need to be manually added if the documentation indicates to do so. If so, check to make sure the property does not already exist. Other properties may be added automatically when a plugin is installed, such as with the Customer Service Management plugin.
Custom system properties
An important reason to use a custom property is to avoid hard-coding information that might change in workflows or scripts. If a change is then needed, it is only a data change, and it is in that one place.
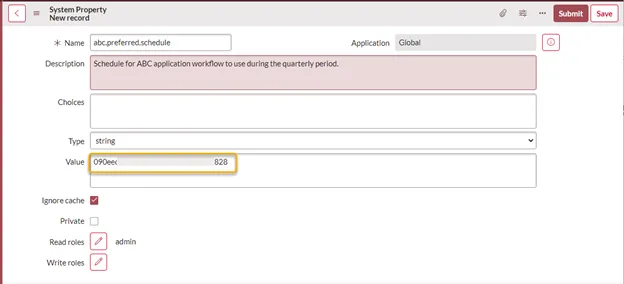
Sys_ids are an example of data that is better to not have hardcoded. Let’s say we have a schedule’s sys_id hard coded in a business rule script:
durcalc.setSchedule(‘090ee129af01234123acc1232134a828’);
If we wanted to use a different schedule, it would require a script update. Instead, we can create a system property, let’s say “abc.preferred.schedule”, and put the schedule’s sys_id in its Value field. This would be easy and low-risk to change, since it is only data.
Then the business rule script can call the property with the gs.getProperty() method like this:
durcalc.setSchedule(gs.getProperty(‘abc.preferred.schedule’));
General steps for making a new system property and referencing it:
- On the sys_properties list, click “New”.

- Fill out the System Property form:
-
Name: a descriptive name, conventionally all lowercase with periods or underscores separating the words.
-
Choices: may be used to list comma-separated values for a choice field selection. See the documentation for more details. We don’t need choices for this example.
-
Type: string, true | false, integer, and others.
-
We’re using string since this is to store a sys_id
-
Value: The data you want to be read from this system property. In this example, it is the sys_id of a schedule.
- Ignore cache: Unchecking or checking this box needs consideration in terms of performance risk for your instance. See the documentation or community forum for details.
-
Click Submit.
-
To reference the schedule’s sys_id that is stored in this property, you can use the gs.getProperty() method with the property name like this:
gs.getProperty(‘abc.preferred.schedule’)
Note that gs.getProperty() only works from the server side, and not directly from something like a client script. Try passing the property to g_scratchpad or using GlideAjax to get to the property from the client side.
Assignment Group example
Even something like a reference to a group in a script (which is better than a reference to a user, because it does not have to be updated when personnel change) can be replaced by a reference to a property that points to the group.
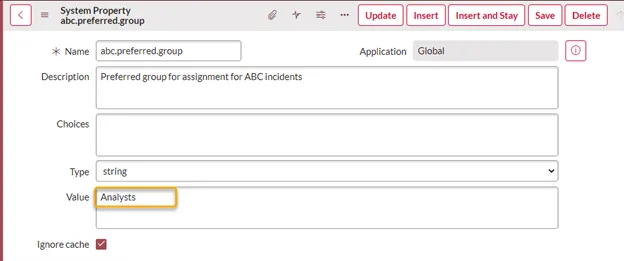
As shown, the system property doesn’t have to hold the sys_id for a reference field. You can put the field’s display name in the property and set the target assignment field’s display value:
var inc = new GlideRecord(‘incident’);
inc.addQuery(‘number’,’INC1234567′);
inc.query();
if (inc.next()) {
// get the property value
var grp = gs.getProperty(‘abc.preferred.group’);
// set the Display Value of the target field
inc.assignment_group.setDisplayValue(grp);
inc.update();
}
User Preferences vs. System Properties
Let’s briefly mention global default User Preferences, because they can seem to function like a system property by affecting many users.
A global user preference record is one that has System=true (which will be the case if the User field is blank). It applies to all users who do not otherwise have that preference specified, so consider that if you do not see a property for a particular UI behavior.
For example, take a User Preference record for incident sort order (incident.db.order.direction) that has a blank User field and is set to “DESC” (for entries to be listed in descending order). That would result in incidents being listed in descending order by default for everyone that does not have a preference record for “incident.db.order.direction”.
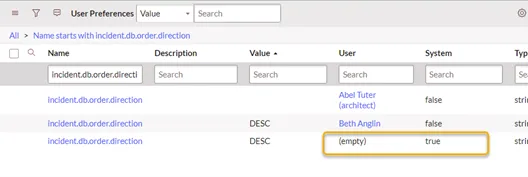
However, user preferences can be changed by the user themselves. As a matter of fact, if a user changes the sort order on the incident list in our example, a user preference record for incident sorting is automatically created and will be used for that user.
Conclusion and Tips
System Properties configure many behaviors on the ServiceNow platform. As there are a lot of properties, you will probably need to search documentation or communities for information on all but the most commonly used ones.
Performance considerations
We have not talked much about performance issues in this article, but system properties are not usually changed on a frequent basis. Also, the “Ignore cache” checkbox on the property should be selected, or not, according to ServiceNow guidelines. There are caching and performance issues to consider. Consult the documentation for more information.
Adding a System Properties module
Lastly, here are the steps for adding a module so you can easily call up System Properties:
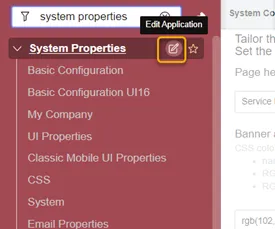
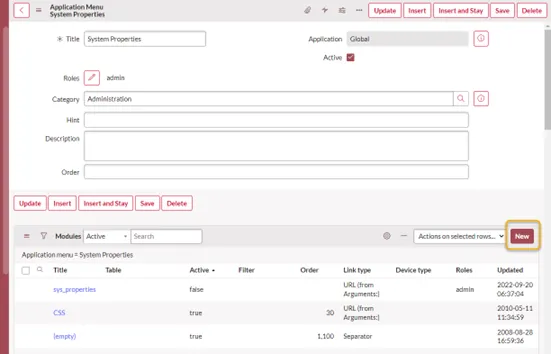
- Look for System Properties in the navigator and click its Edit Application box.
- On the Application Menu page that opens, click the “New” button in the Modules-related list.
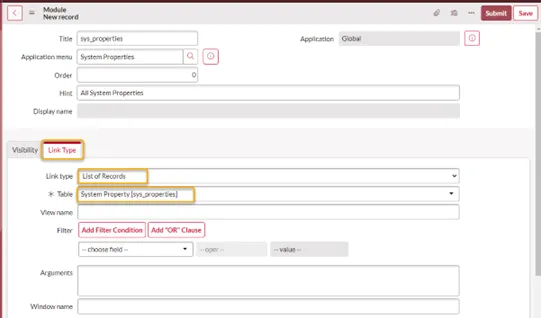
- Give the new record a Title, and optionally fill out the Order and Hint. In the “Link Type” related list Link type = “List of Records” and select sys_properties for the Table. Click “Submit”.
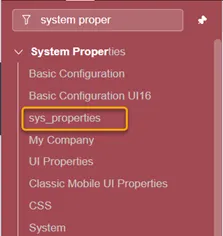
- The new module should now display in the navigator under the System Properties menu. The name and order of it may be different than shown below, depending on what you specified.
Thank you for checking out this article on system properties. We hope it has been of use to you!