Garrett Griffin-Morales
Introduction: Reviewing some View basics
Form and list views can display records in ways that fit different uses. For instance, you may have noticed the differences in how Incidents & their lists appear depending on how they are opened when working in ServiceNow:
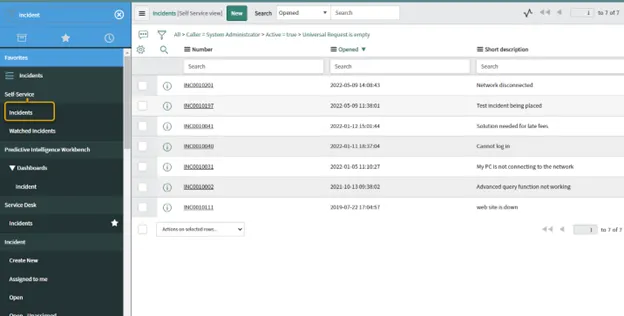
If opened from the Self-Service application menu (Self-Service > Incidents), the Incident list has 3 or so columns as shown below. (Not shown - If a record is opened from this list, a stripped-down view of the incident will be shown.)
The text “[Self Service view]” in the list’s title bar shows that the Self Service view is being used.
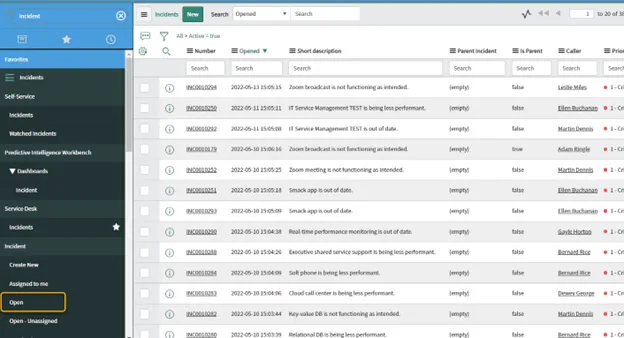
If opened from Service Desk > Incidents or Incident > Open, the Incident list will have more columns in the view. (Not shown, but a record opened from this list will also show more fields than in self-service.)
Notice that the bracketed [ ] view name is not listed next to the word “Incidents” in the title bar, as it was for the Self Service view. Having no view name listed means that the Default view is being used.
[NOTE: The example of the Incident Self Service vs. Default views comes OOB from ServiceNow and does not use View Rules. It is just a convenient example of two form views available for comparison.]
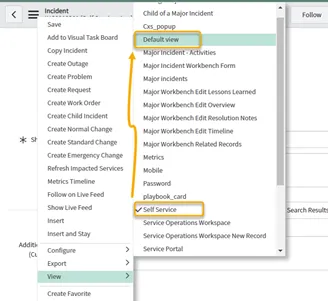
Of course, views can be manually selected by users from the Context/Title menu > View > (name of view). Here is a screenshot showing the current Incident “Self Service” view checked in the menu, with the highlighted “Default view” being selected.
However, what if there is a need to prevent a person from changing a view? How can you make someone use a particular view based on what role they have or some value on the record, for example?
One way is through the use of “View Rules”.
Example case for a View Rule
View Rules are simple but powerful. They allow you to conditionally control what view is displayed to a user.
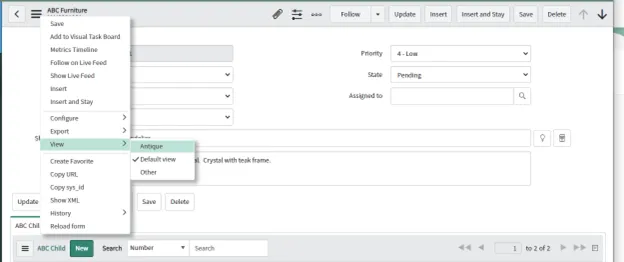
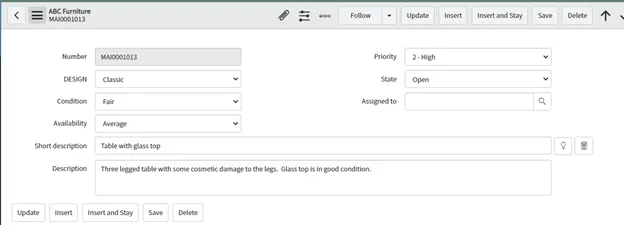
Here’s an example form we made called “ABC Furniture” that keeps information on furniture inventory.
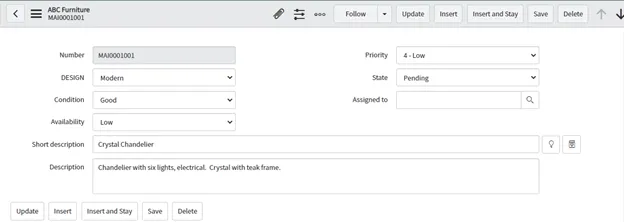
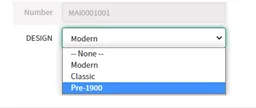
A field on it that is labeled “DESIGN” has three choices: Modern, Classic, Pre-1900
This form’s context menu shows three views (Antique, Default view, Other). In this screenshot, we know that the Default view is displaying because there is no view listed next to the name “ABC Furniture” in the form header, and we also see that the Default view is currently checked in this menu.
Let’s say the Default view is what we normally want to use, but users should see the “Antique” view if DESIGN is “Pre-1900”.
Of course, client scripts or UI Policies can show or hide fields, but if you want to really mix things up and have a different screen layout, use a different view. That’s why this “Antique” view was created.
[NOTE: See the end of this article if you need a pointer on creating a new view.]
Making a View Rule
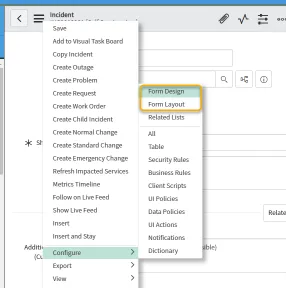
- When viewing a record, from its context menu select Configure > “All”.
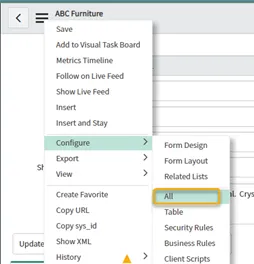
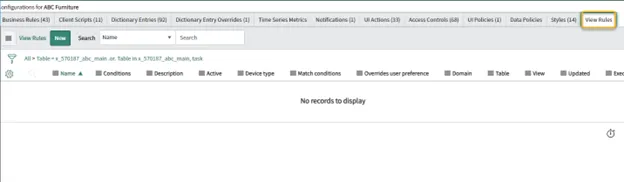
- A tabbed screen of configuration options displays. Select the “View Rules” tab, which is the last tab shown. Click “New”.
A New record screen opens with the Table field already filled in.
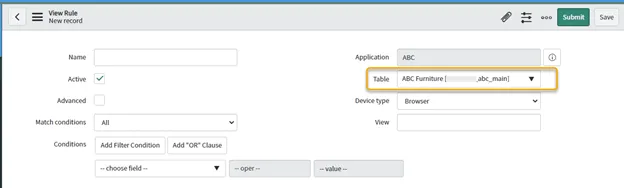
[Note: You can also open a new View rule from the left Navigation pane > System UI > View Rules. That method will require you to select the Table manually.]
-
Fill in the fields as needed.
-
Name - any descriptive name
-
Device type - defaults to “Browser”, but can be Mobile or Tablet if needed
-
If Advanced is blank:
-
View - the exact name of the view you want to enforce. Note that this is blank if it is the Default view that you want to enforce. (Default views do not have a name!)
-
Match conditions - (All or Any)
-
Conditions - specify the criteria needed to make this view be used.
-
-
If Advanced is checked:
- A script field will display where you can place the code.
-
In this example, we’ll just specify a simple condition so that if the Design field is “Pre-1900”, the “Antique” view will be used.
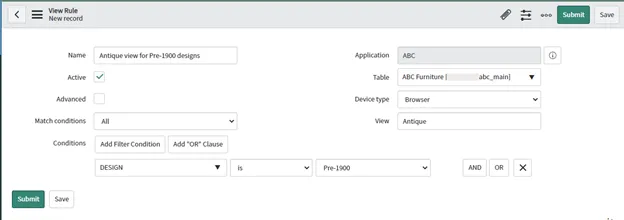
- Click “Save” or “Submit”.
Testing the Rule
Here is the normal Default view of the ABC Furniture record:
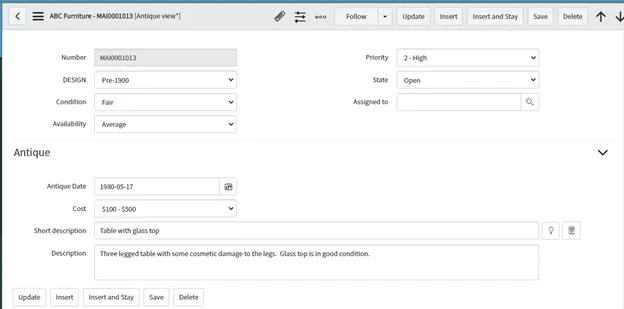
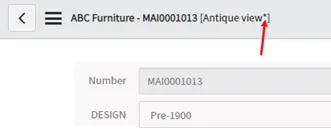
If the same record is updated so the Design is “Pre-1900”, and the form is re-loaded, the Antique view displays. An asterisk appears next to the view name, indicating a View Rule is in effect.
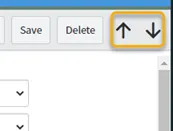
Other view rules may be added to the same form, as well. As a matter of fact, a view rule by itself might get you “stuck” in a view even though you’re viewing different records for which that rule is not intended. For example, that could happen if you’re using the up and down arrows in the form header to move between records instead of opening the records one by one from a list.
View Rule Effects
- Obviously, the main effect is that the view listed in the View Rule will automatically be applied when the rule’s conditions are met.
- When a View Rule runs on a record, an asterisk will display next to the view name in the form header, such as here with [Antique view*]
- Users cannot manually switch to a different view than the one specified by the view rule. Notice that the option is not available in the context menu of this record.

Conclusion
That covers the basics of View Rules. There may be two or three other methods for controlling views, but this is a very powerful and straightforward way to do so.
P.S. - Creating a new View
This article does not go into how to create a view or work with the fields within a view, but as a reminder, a new view can be added in the same places you can modify views: The Context/Title (hamburger) menu > Configure > Form Design or Form Layout, depending on which one works better for you.
View names should only use uppercase or lowercase alphabetical characters, digits 0-9, and the underscore (_). They should not contain spaces. Also, do NOT create a new view and name it “Default” - you may create a confusing situation if that is done!