If you are creating any integration involving an external system, you will most likely need to send a request to the external system at some point during the lifecycle of the created ticket or task in ServiceNow. In most cases, you are either going to be sending either a REST or a SOAP message. I will talk about sending REST messages, as that is the more common of the two. To get this integration started, you will need 4 things from the external system:
- The endpoint to send your requests to
- The Credentials for authentication
- Any HTTP Headers that need to be defined
- The HTTP Body that is expected with the given API.
Creating the REST Message
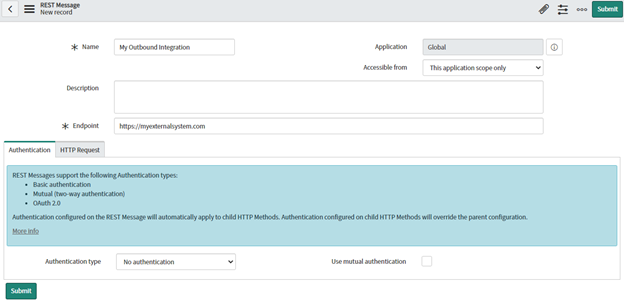
In your ServiceNow Instance, use the navigator to go to System Web Services → Outbound → REST Message. This is where you’ll see all of the outbound requests configured using this module. Click ‘New’.
Here we will want to give this REST Message a meaningful name, and an endpoint. This does not need to be the full endpoint, as these can be overridden in the individual HTTP Methods (more on this later).

Once submitted, we will then want to set the Authentication type to either OAuth 2.0 or Basic. This is required for most API’s, but there are some available that require no authentication. In this example, we will use Basic Authentication. With Basic Authentication selected, a new field is shown directly below, called ‘Basic Auth Profile’. If you have the profile already set up, you can select that profile. If not, you are able to click ‘New’ in the Basic Auth Configuration list, and set the name, username, and password from that window. Click submit and save the REST Message record.

Creating the HTTP Method
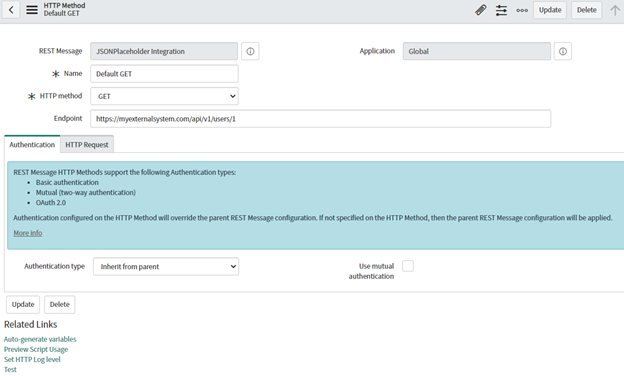
As you may have noticed, when you first saved the REST Message, ServiceNow automatically created an HTTP Method for you, named ‘Default GET’, with an HTTP Method of ‘GET’. There are different HTTP Methods available to use. There are some overlapping methods, but generally, these are the most common HTTP Methods available:
- GET: Retrieve data
- POST: Send Data to either create or update a resource
- PUT: Send Data to either create or update a resource
- Important: PUT is idempotent, meaning that executing the same PUT request 5 times will give the same result as executing it once.
You will need to know which HTTP methods are available for the API you are connecting with, and the syntax for each method. Any documentation that can be provided to you on how to use the API will be very helpful. In this example, we will use the Default GET message, but rename it to ‘GET User’. Here, we will want to specify the exact endpoint we will be sending a request to.

This will retrieve the first user from the external system. In the Related Links section, we can click Test to verify the connectivity between the ServiceNow system and the external system. If you get a ‘User Not Authorized’ response, or anything with an HTTP Status Code of 401, you will need to verify your credentials.
If the request was successful, you might get a response like this:
{
“id”:1,
“name”:”Leanne Graham”,
“username”:”Bret”,
“email”:”[email protected]”,
“address”:{
“street”:”Kulas Light”,
“suite”:”Apt. 556″,
“city”:”Gwenborough”,
“zipcode”:”92998-3874″,
“geo”:{
“lat”:”-37.3159″,
“lng”:”81.1496″
}
},
“phone”:”1-123-456-7890″,
“website”:”myexternalsystem.com”,
}
Variables and Scripting
Instead of hard-coding to retrieve the first user, we can specify variables, which we can replace in scripts later on. If we were to replace the ‘1’ in the endpoint with ${id_number}, we can dynamically set this value at run time. Clicking the Related Link ‘Auto-Generate variables’ will populate the variable substitutions related list with our new variable. We can set the ‘Test value’ of this record to 2, and any time we click the Related Link ‘Test’, it will replace our variable with 2. In other scenarios, we may have variables being used in the headers or body, but for now, we’ll only use the one variable in the endpoint.
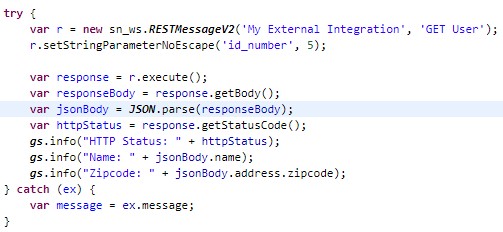
To use this REST Message in a script, we can click the Related Link ‘Preview Script Usage’ to get us started. This will open a window with the javascript code to send this request. This code will work in any server side code, but if it’s in a business rule, the ‘When’ field must be async.
One useful function that is commonly used in integrations where the response contains a JSON object, is the JSON.parse function, passing in the responseBody variable as the only argument. This will convert the string variable ‘responseBody’ into a JSON Object. This allows you to easily access any value retrieved from the response body.

This was a very simple HTTP GET Request we made. These same concepts can be expanded out to almost any REST integration though.

