
If you are an administrator who is familiar with setting up Email Notifications, you may come across a need to set up notices that include a calendar invitation. It is not hard, but it does require setup beyond just the notification record itself. Below are some steps to create a simple calendar invitation that is emailed.
There are three parts to this process. This assumes you have a custom form with two Date/Time fields that will specify the beginning and end of the event.
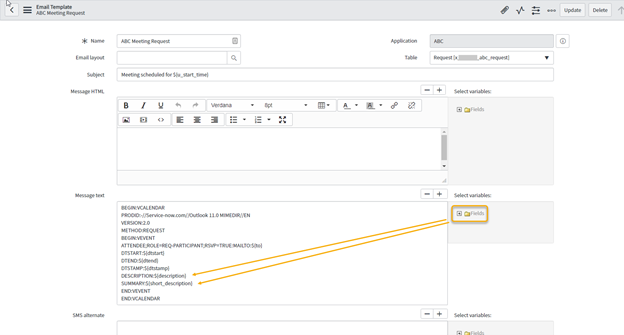
Create an Email Template
- Go to System Notification > Email > Templates and click “New”. [You might first search for name *cal and open an existing calendar template to just to see what it looks like.]
- Enter Name
- Enter a Subject
- Select the Table whose information will be in the notice
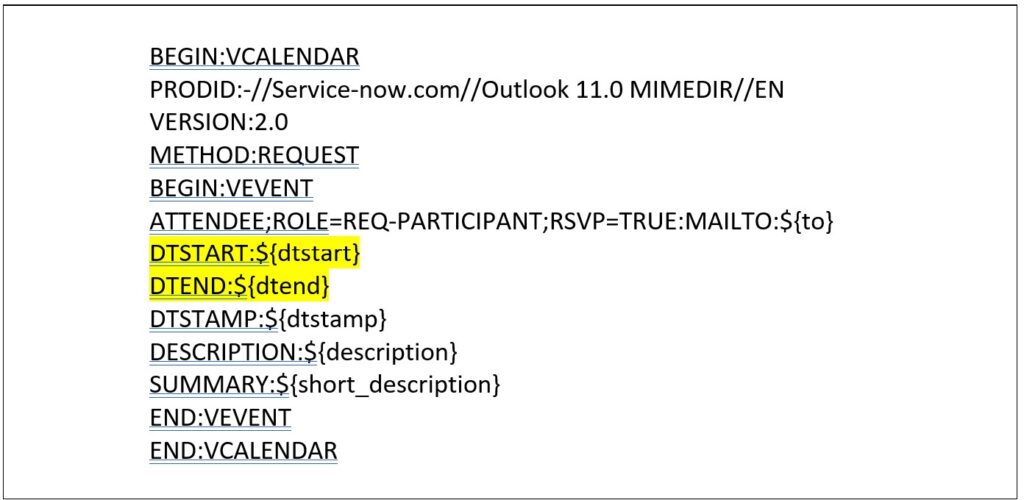
- Put the following block in the Message text field. DESCRIPTION and SUMMARY may need different variables for your table, which you can get from the “Select variables” folder tree. However, leave the variables dtstart and dtend as they are below.
Tip 1: Trailing white space can cause the invitation to fail! If you copy and paste this block from this article or the ServiceNow site, check for and remove any trailing space found on each line.
Tip 2: There are other items that can be added to this file to set the meeting organizer, reminder, etc. This is a very basic example.
The template should look something like this:
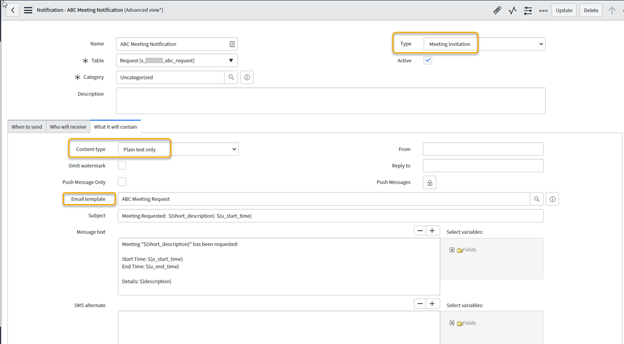
Create a Notification
- Go to System Notification > Email > Notifications and click “New”.
- Set Type to “Meeting Invitation”
NOTE: If the Type field is not visible on any of the form views, as was the case for me, you might have to add it to a view. To do that, click the hamburger menu (three stripes in the upper left) and select Configure > Form Layout, move it from the left pane’s slush bucket to the right pane, then click Save.
- Fill out the notification fields as you normally would, including the “When to send” and “Who will receive” tabs.
- On the “What it will contain” tab:
- Content type = “Plain text only”
- Email template = select the template you created
- You will probably want to add a Subject and perhaps Message text. In my testing, the subject was used in the email, but the Message text only appeared on the calendar entry itself.
- On the “What it will contain” tab:
Map the calendar to the fields used in the email template.
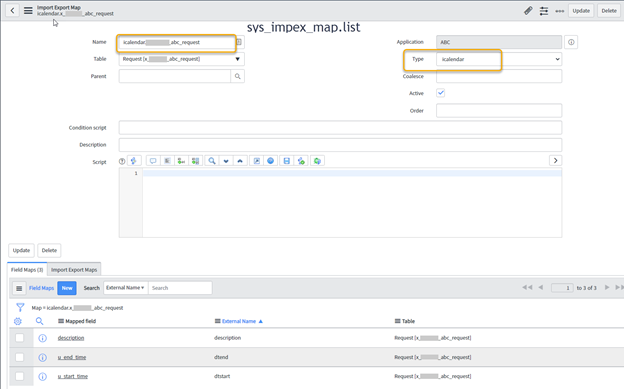
- Enter sys_impex_map.list in the Navigator Filter.
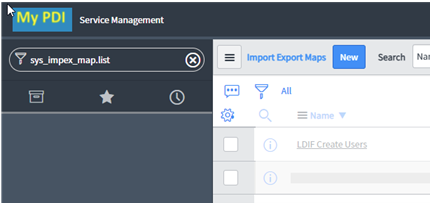
- Create a New entry for Import Export Maps
- Name = icalendar.nameoftheform
- Table = the table used by the Notification form
- Type = icalendar
- Save
- Create entries in the Field Maps table at the bottom of the form
- Click the blue “New” button.
- When prompted, choose “Mapping to a database field”.
- Select the field to be mapped.
- For the external name, enter the variable name.
- Save or Submit.
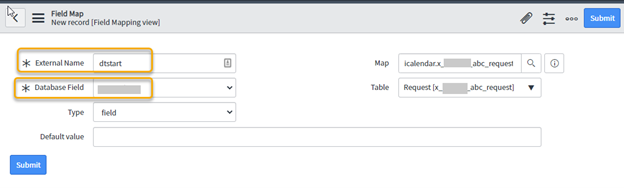
- REPEAT to make a field map for each variable that needs to be mapped.
- At minimum, the starting date field should be mapped to External Name dtstart and the ending date field should be mapped to External Name dtend
- Map whatever field is being used for description, since mapping will assist with large text fields that have to line wrap.
After the mapped fields are added, the Import Export Map record should look something like this screenshot:
Testing the Invitation
The best way to test what you have done is by creating a notification that you receive in an email account tied to your calendar.
But if you are on a development system from which you do not receive an email, you can manually upload a test calendar file. This will at least confirm that the calendar file is formatted correctly.
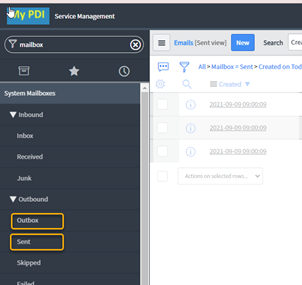
- Trigger the email notification by updating or creating a test ticket appropriately, then find the email record created by it. Email entries can be found under System Mailboxes > Sent for sent email, though they may be in System Mailboxes > Outbox if they are not processed yet.
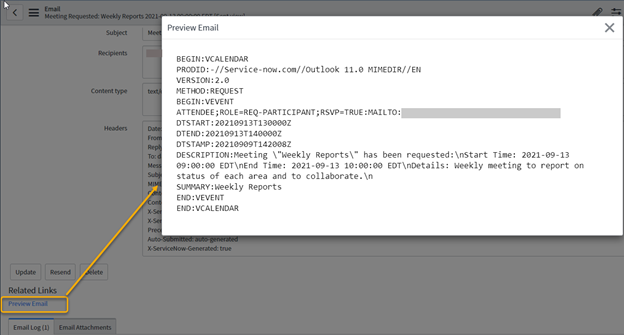
- On the email record, click the “Preview Email” related link to view a preview of the message. Copy & paste this content (BEGIN:VCALENDAR through END:VCALENDAR) into a new text file that is saved on your computer.
- Manually upload the file into your calendar account and see if the event imports correctly.
For instance, in Google calendar, go to the gear icon (Settings menu), select “Settings”, then in the left pane of the settings page select “Import & Export”, select the file to upload, and click “Import”.
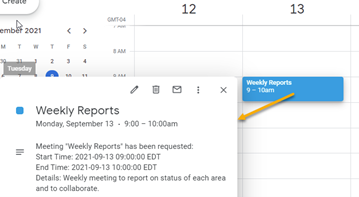
View the resulting entry to verify the information is correct.
Conclusion
This article walked through setting up a basic iCalendar invitation. There are additional items that can be specified in the file; look in the ServiceNow community site for other options. You may also view the ServiceNow documentation, which will give more details than these highlights: https://docs.servicenow.com/bundle/rome-servicenow-platform/page/administer/notification/reference/r_CalendarIntegration.html